

I've just about finished sewing Sophie's coat, and although I must say I am extremely pleased with how it's coming along, the dark grey fabric makes it look a little austere for an especially sparkly (and naughty!) toddler. I decided to make a star-shaped pin to wear with it, but wasn't sure whether to sew or bead or find a star blank to paint. Then, I remembered this crochet star tutorial. After doing a few test stars and deciding they were just what I wanted (and dead easy!), I made this pin in about an hour (not including drying time after felting the star). Here's how!
What you need -
-100% pure wool yarn (8ply, suited to knitting on 4mm needles)
-3.00mm crochet hook
-Some flat, flexible plastic (I cut mine from the side of a plastic milk jug)
-A long-ish needle to sew your front and back stars together
-Ribbon of your choice (something a bit stiffer than satin, like organdie or stiff nylon
-Brooch finding or safety pin
-Sequins, seed beads, etc. to decorate (optional)
For felting -
-Two bowls, one with water from kettle that's just boiled and a little squeeze of dishwashing liquid, and one with cold water, and a couple of ice-cubes, if you have them.
-Rubber gloves (so you don't burn yourself!)
-A towel
What you do -
With your yarn and crochet hook, make two stars using the crochet star pattern found at the (wonderful!) Foothill Home Companion. I admit that when I first eyeballed this pattern, I thought it looked tricky, but it's not at all. The stars work up really quickly, and I can think of a tonne of projects I want to use them in. I'm not too cluey with all the different trebles and I had to google some of them, and the instructions I needed were found easily.

After your stars are made, weave in any loose yarns or tails. You can pop a couple of stitches through the hole in the centre too, if you like, just to close it off.

Take your plastic and trace one of the star shapes roughly onto it.

Now, cut out the shape with some tough scissors, but cut a few millimetres inside the line you drew because it has to be smaller than your woolly stars. Just trim away a bit at a time until it looks something like this.

Take a length of yarn and strip a couple of ply from it to use as thread to sew your stars together. Now, the plastic star will be sandwich between the two stars and will help to keep it rigid. Curly arms and legs on a star look a bit lame. The best way to get it all together is to place your yarn stars wrong sides together, sew one or two points together using an overcast stitch (see my amazing technical diagram below)...

... then slide the star shape in, and then continue sewing the remaining points around the rest of the star.

All done.

Oooo, now it's time to felt. I love this bit! Get your bowls of hot and cold water set up and don your gloves. Plop your star into the hot water, and rub it to mat up the fibres. My gloves have this friction-y type surface on the palms, so I rubbed it between my two gloved hands. Or just rub it between your fingers. Do this for about a minute. Then dunk it in the cold water to the shrink the fibres you just mushed up, and mush it up a bit more. Do this for about a minute, too.

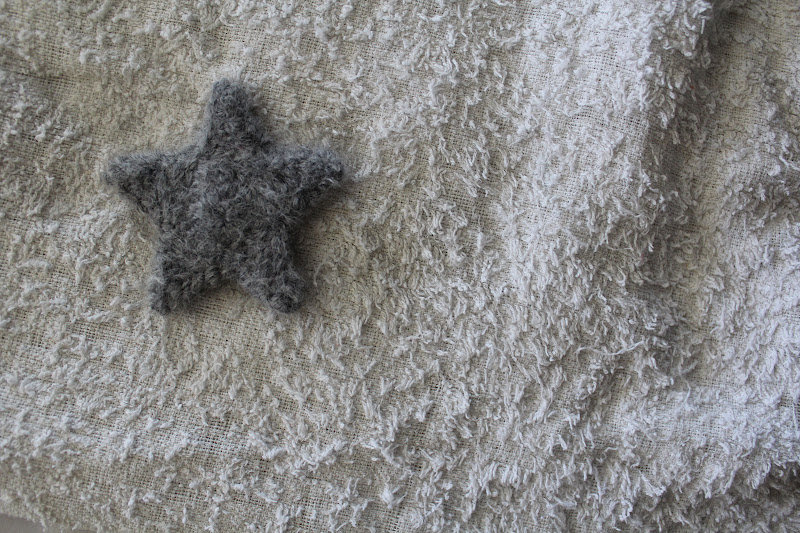
Keep repeating this process until you can't see the crochet stitches anymore, and it looks more like felt than crochet.

Rinse in some cold water to get rid of the soap, and then press between two layers of towel to squeeze out as much water as you can. Shape it with your fingers a bit to get the star shape as you want it, and leave to dry on the towel.
While your star is drying, cut some lengths of ribbon. It's best to cut them a bit longer than you want the end result to be because you will trim them later. Shape them into a tail formation, and when your happy with them, stitch them to hold their shape.

Once your star is dry, stitch the ribbon tail to the back...

...then stitch your brooch finding on. Clip the ribbon to a length that it's not floppy and trim the tail of your ribbons diagonally. I like to spray mine with a bit of hairspray to keep the ribbons nice and stiff, and stop the ends from fraying. And there you go...

Ooo, and add some sparkly bling if you like!

And don't forget that when you're wearing your shooting star pin, you are allowed to make wishes all day long. It's the law.
this is just beautiful, so wish I could crochet, keep trying but just cant get it!! xx
ReplyDeleteThis is beautiful. I'm so so impressed with all that you do!
ReplyDeletevery cute! and this felting... very good idea! Also with crocheted hearts! thank you!!
ReplyDelete