Little girls are fickle creatures. One minute, they want to dress up as delicate fairies, sporting fluffy tutus, pretty wings and sparkly headpieces, spinning about from here to there like music-box-ballerinas, and the next they are thrusting sticks violently into ant holes and excitedly watching the ensuing drama, or kicking bigger kids down the slide because they are 'being slow'. The tutu gets grubby, the wand gets lost, the headgear and the wings comes off, and before long you're left with a messy kid and a handful of sparkly accessories to lug about until you're ready to go home. That is unless your grub of a child decides she wants to be a fairy again five minutes later.
This little crown can be stored flat in a purse or nappy bag, and pulled out when your child has a sudden attack of the whimsy. Make and pack an extra one just in case she finds a friend with fairy potential.
What you need (for each crown)
- 2 pieces of fabric of your choice for the outer and backing of the crown - each measuring
approx. 20cm x 30cm
- Iron-on adhesive (I used Heat n Bond Lite) cut into 2 pieces - each measuring approx.
18cm x 28cm (just slightly smaller than the crown outer and backing)
- A piece of woolen fabric, or felt - measuring 20cm x 30cm
- Bias binding - 10mm wide
- 6mm elastic
- Velcro (hook and loop tape) - approximately a 10cm strip
- Embellishments - craft pompoms, ribbons, beads, sequins, etc. Consult your fairy princess for
ideas.
- Materials for making your template - paper, thin cardboard, glue. Or print it out on cardstock.
What you do!
Firstly, save the pattern sheet below to your computer, print out the pattern template onto paper, glue onto thin cardboard, leave to dry, and then cut out. Or, if you have card-stock available, print the template straight onto that and cut out and save loads of time.
Following the manufacturers instructions, apply the iron-on adhesive onto the wrong side of your chosen fabrics.
Leave to cool for a bit, then, again following the manufacturer's instructions, apply the fabrics to both sides of the woollen fabric, or felt.
Place the template on the side that has the fabric you are using as the backing, and trace around it with pencil or chalk.
Cut out crown shape carefully.
Cut a 24 cm piece of 10mm bias binding. Iron it out flat. Pin binding along bottom edge on right side, folding in the ends so that they are in line with the crown's sides.
Using your sewing machine, stitch with a 6mm (1/4 inch) seam allowance.
Fold the bias binding over to backing side, forming an even edging and press (I don't turn in the long edge on the backing side, I just leave it). Hand baste into place.
Using your sewing machine again, stitch in the ditch between the crown
and binding on the right side (you'll catch the binding on the rear side
at the same time). Remove hand basting.
Make button holes where marked.
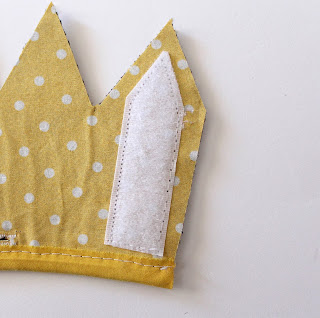
Cut and trim velcro to size. Pin and stitch the rough 'hooking' piece to the outer crown on the far right, as pictured.
Turn crown over so the backing is facing upwards. Pin and stitch the fuzzy catchy strip to the far right side again, as pictured. (Velcro piece will be on opposite ends of the crown, one on the outer crown, and one on the backing. I hope that makes sense :S)
Measure the elastic around your fairy's head. The crown is worn with the elastic coming around the back of the head and toward the front, much like an Alice-type hairband. Measure it so it's firm, but not tight, and leave a bit of extra length for adjustment. Thread each end of the elastic through the button holes into the crown with the aid of a safety pin.
Knot it to the length you require (the knot should be hidden within the crown when worn), then trim elastic ends to within about 1 to 2cm of the knot (you can sew these with a few stitches to the elastic, just to keep them in place, if you like).
To decorate ours, we very simply just fixed some small craft pompoms to the top of each point, sewn to the front side at almost the very top, with very small stitches. The very top of the crown's points were visible above the pompoms, so we carefully clipped them off, just to neaten it up.
However, you and your fairy could add sparkly sequins or beads, buttons or bows - go as crazy (or as not) as you wish.
Keep one or two packed in your purse or in the dash of your car and pull them out for photo opportunities or five minute fairy games (before the hunt begins for a big stick to poke into an ant colony).
.jpg) |
| Sweet. But don't be fooled. |


Very cute and your tutorial is awesome, makes it look super easy. My girls will love making these with me. Thanks for sharing.
ReplyDeleteHugs
Caroline
It's so pretty and so cute! And I love that it stores flat! No smushed crowns for our little princesses!! I've linked to your tutorial over at Craft Gossip: http://sewing.craftgossip.com/tutorial-fabric-mini-crown-that-stores-flat/2014/01/16/
ReplyDelete--Anne
Such a great idea! love this project!
ReplyDeletewww.sweetlavenderandchiliflakes.blogspot.ie