Showing posts with label fun with paper. Show all posts

12.7.15

I don't know what I'm doing.....


This space has been a bit quiet of late, and I'm sorry for that.  I have this little fancy that I'm going to make up some kids clothes and other bits and pieces and open a little etsy or Big Cartel store and sell them.  I have no illusions that I will make thousands from doing it - really, I'd just like it to be able to pay for itself and perhaps a bit extra to finance some of the kids' taekwando lessons.  You know, fabric and fighting fees.

So, I've been sewing up little things, set up an instagram account, set up another facebook page and another blog, all with the intention of leaving this one behind and heading full tilt into my new project.  Because, I thought, I can't possibly do both.  If I'm spending all my free days sewing up goods to sell, I won't have any time to make up new tutorials or any other of the fun stuff I do here.

And that sort of saddens me.  Because I love doing this.  And I miss it already.

I may not have (and have lately, not had) the time to write up tutorials, but still want the option to be able to do that, especially as I have had piles of ideas, and lots that would complement the clothes I plan to make.  I could write up tutorials on the other blog, but to be frank, the idea of starting all over again makes me feel terribly mean, as if I'm abandoning everyone who has supported and followed along on my adventure here thus far.  And, as I'm sure has been mentioned in passing a hundred times before within these pages over the course of the last four years, I'm very lazy.

Besides which, when the kids and I make bird heads out of cardboard boxes, we want to be able to show them to you without them looking like they were placed on another blog by mistake.  Although I love making kids clothes, and hope that I can sell some, I've kind of worked out that I still need my space for all the other things I love to create and share.

So, my blogging journey is about to take a bit of a turn - it might be a temporary detour, or turn out to be something more concrete.  In the next few weeks, you will see a shop link in the sidebar, which will direct you to my (Etsy or Big Cartel) store (I've not decided which yet).  My store is called on june or janet (the Maker*land moniker didn't really fit my wares, and I've learnt that it is actually the same name used by other pages/websites - I didn't want there to be any confusion).  It'll be a bit like being my own sponsor, I suppose.  I've changed my Instagram account to @makerlandblog and it will incorporate both my shop and what I do here (with a couple of happy snaps of the kids and sunsets thrown in for good measure).  I'm putting the kybosh on the other blog, but will keep the new facebook page (feel free to visit it and click that 'Like' button).

I hope you'll bear with me during this time.  It's a bit of a transition and one I hope will happen smoothly.  I want to share everything I'm up to, but at the same time, I don't want to be shoving my new venture down your collective throats and for this blog to become about promoting my store.  I may share one or two photos here and there so you can see what I'm up to, but will leave the hard sell to the store's facebook page and Instagram, which you can visit if you're interested.  That's the plan anyway, we'll see if it works.

And what's to say my store won't be an epic fail and all this worrying was just a big waste of time and words.  In fact, that's the most likeliest scenario yet.


2.11.14

Another visit to Mum's...

"There is always room for more." Crayola markers, crayon, collage.

...which ended in another collage.  Not that the conversation was boring or anything, but I just woke up with busy hands.  I have days like that.
 

18.10.14

Halloween hairband - tutorial


Halloween is almost upon us - and although it is still a fairly new tradition in  this part of the world, any holiday that endorses dressing up in costume is alright by me.  I'm still not sure about this whole trick-or-treat business, but I'm all over the dress-ups in a big way.  Actually, in a world ruled by me, everyone would be in costume every day.  It would be the law.

But I'm not so keen on those plastic, mass produced discount store costumes, nor the slackers that turn up on the front step in animal onesie pyjamas.  Some effort is needed if you are knocking at my door looking for treats.  I would rather see a kid dressed in a bed-sheet and a mask he or she made herself or wrapped up in a couple of rolls of toilet paper.  Sorry to be a hard-ass, but plastic Scream masks are just so yawn.

Halloween or not though, this is a fun dress-up accessory that the kids (and their adult helper!) can go a bit wild on.  And you will probably have to visit the discount store to get a few things, but in the end, you will have something that could look pretty schmick, totally unique, and you'll have had fun with glue and glitter and paint in the process.  What's not to love, here?

I've done a few variations here to illustrate some different ideas, but once you've made the hairband base, you'll come up with loads of ideas yourself, I'm positive.  This hairband could be adapted for all sorts of occasions - birthdays, bachelorette parties, Christmas, school plays - go wild!

First up, we'll start with the hairband base.  The instructions and materials list include what you need for one hairband.  But of course you could make several at a time.

What you need 

- Cheap plastic hairband (I found a pack of two for two dollars at my local Value Zone).
- 1 chenille stick, 30cm long.
- Sello tape or masking tape.
- Craft ribbon or bias binding - about 2 metres (the cheap stuff is fine).  Even better if you can find it, is the ribbon elastic that is use to make elastic hair-ties - being stretchy, it is much easier to work with.  But it does cost more to buy.  Your call.
- Needle and thread (the same colour as the ribbon).
- Craft glue
- Two straws.  The cheap striped paper ones are ideal.

What you do

Take your chenille stick and bend it  as shown in the diagram below, so it looks like a pair of cat ears.  Please disregard the fact that when you add up the measures in the picture, the total comes to 28 centimetres, not 30 centimetres. I think I was ripped off a couple of cee ems on my chenille sticks.  And a bit of the length is taken up in the bends.  Your chenille stick  doesn't have to be spot on measurement wise, just so long as your prongs can support the straws when you stick them on, all will be sweet.


Twist up those cat ears to make prongs.


Position your twisted chenille stick on the hairband, and stick into place with tape.


Now to wind the craft ribbon around the hairband, from one end to the other. Start my taking the ribbon and winding it tightly two or three times around one end of the hairband to anchor it.

 
Then proceed to wind around the entire band, covering the parts of the chenille stick that are taped flat against the band, but leaving the prongs free.  


Once you make it all the way to the end, again wind it around the band  two or three times tightly, snip the ribbon and secure with a few tight hand stitches through the ribbon (this is really the most time consuming and boring part).  Once finished, it will look like this - 


Dab on a generous amount of craft glue on each prong...


...then slide the straws on.  When you push the straws onto the prongs, a bit of glue may be pushed along with them, leaving a big glob of glue at the base of your antenna.  Wipe over gently with a lightly moistened cloth (not too wet or your straws will go soggy) to remove the glue, and leave to dry for a half hour.  Most craft glue dries clears so you won't see any that you may miss.

Once dry, the fun begins - time to decorate!  I could have gone crazy making hundreds of these, but here are just a few for ideas.

For the boys - ALIEN ANTENNA


What you need

- Two ping pong palls (again, the discount store helped out with really cheap, fake ones which are most likely useless for table tennis).
 -Black kids poster paint
 -Kindy glitter glue in colour of your choice
-Paint brush

What you do

Make some holes in your ping pong palls.  I do this by starting with a pin, and then re-piercing the same position with a thicker needle, then re-piercing again with a knitting needle, etc. finding thicker things to pierce the same spot until the hole is thick enough to accomodate the straw.  You culd try wiggling your piercing implement about, in I guess you could call a reaming movement, but very gently, otherwise the ball may split - be careful!  


Pop your ping pong balls on the end of a couple of sticks or spare straws.  Holding the stick or straw, paint with the black paint so that they are entirely covered.  Stand them up in an old cup and leave them to dry.

Once dry, give the balls two coats of  kindy glitter glue, leaving them to dry in between coats.  

Trim the straws on the headband to the length you'd like (take into account the length of straw that will be pushed into the ping pong ball, and then  gently screw the ball onto the straw.  Done.


(*Note - if you're in a hurry, and can't wait for three layers of paint to dry, you could stick on some black circles of paper, or black sticky dots to make eyeballs, like the one Sophie is wearing.)


For the girls - FAIRY ANTENNA


What you need

- Cardboard or craft foam sheet - we used silver craft foam sheet for ours.
- Craft glue.
- Star cookie cutter (or any other shape you might like)
- Pen.


What you do

Take your hairband base and trim straw to desired length.  Flatten the ends of the straws.


On the rear side of your cardboard or foam sheet, trace around the cookie cutter with pen and cut them out. You will need four shapes.


With hairband on a flat surface, place shapes right side downwards, under the straws as shown.  Cover with glue.


Place other two shapes on top of the glue covered ones and press down, sandwiching the straws between the shapes.  Leave to dry (you could put them under something heavy to make sure they dry flat).


And for the absolutely fabulous! - SHOWGIRL HEADPIECE


What you need - 

- An extra three chenille sticks
- An extra six straws
- Foam craft sheet or cardboard- 2 sheets should do it.
- Star cookie cutters, different sizes (or whatever shape you desire)
- Sello-tape or glue
- Scissors
- Pen

What you do

Now for this one, when making the hairband, shape all four chenille sticks, position them on the hairband and stick them down with tape, so your hairband looks like this:


...and then proceed to wind the ribbon around the band, keeping all the prongs free.  Then make as for the the fairy antenna, but of course, you have eight prongs to glue straws onto and stick stars on to.  I was slack here and did not sandwich the straws between two stars, but instead just taped them on.  On the rear side, you can see the straw stuck on with sellotape.  I just didn't have enough time or glittery sparkly cardboard, but if you want it to look as good from the back as it does frontways, by all means sandwich away!  I did however have enough sparkly gold cardboard to make eight smaller stars that I stuck lower down the straw to give it extra sparkle.  

Not that I think my two need any extra sparkle.


So, there you go, quick and easy, cheap and cheerful.  Good for Halloween dress ups at any time of the year.  I am particularly liking that last one for me, actually.  I could totally carry that one off daily, I think.  A world ruled by me, dressing up would be law, remember?  It looks like the Queen has found her hat.

15.7.14


We killed a couple of hours today painting big cardboard heads.  Sophie is always in the mood for painting, and although she didn't make a big cardboard head of her own, she did manage to paint a large picture which must incorporate every shade of brown that could possibly exist. 

I had some large cardboard boxes that I'd brought home from work, so we cut them down, painted them and then added some extra cardboard brackets to the bottoms so they could stand up.  Cameron was in a royal mood, apparently, and made his into a forlorn looking king with a white five o'clock shadow and a spiffy alfoil crown.


Oh, do cheer up.

Sophie had a nice chat with mine.  She told him that she liked his 'sausage nose'.  I'm not really sure whether that's a compliment or not. 


16.4.14

Five minute paper puppet.


It's a rare thing to get my daughter to sit down and concentrate on anything for more than five minutes, and this was no exception.  She has been badgering me to do some drawing for the last couple of days, but once we had pulled everything out of the art box, sat down and did five minutes of colouring, she was over it.  Still, it was enough time to cobble together this little rabbit puppet, and she has been toting him about for most of the afternoon.


According to Sophie, colouring inside the lines is for amateurs, but luckily it's not really necessary for paper puppets.


She is already planning her next one, which will have "blue tiger stripes and a big woolly moustache".


30.3.14

Sunday collage.


I pack up the kids and take them to my mother's house every Sunday morning, and we stay until after lunch.  Sophie and Cameron haul everything out of every cupboard they are allowed into, which is pretty much all of them.  My Mum has no concept of control when it comes to her grandchildren - Oh! how things have changed since I was a child and living under her roof.  Hmmmmm.

Inevitably, Sophie will drag out the arts and crafts box and slam it in front of me, announcing loudly "Let's draw!", hang around long enough to wildly scribble on a piece of scrap with texta, and then take off somewhere else.

By this point of the morning, my Mum is probably talking about politics or her financial affairs and I am beginning to glaze over.  I start to snip at bits of cardboard and doodle funny animals.  She is aware that I am turning off, I am aware that she will continue to talk regardless, so I continue doodling, she continues talking, and we are both happy in our little worlds.

By the end of the morning, she has probably relayed some extremely important information that I will need to know should 'anything happen to her', which I have completely missed and will no doubt regret, and I have made two silly collages of Noisy Bill and a bubble blowing elephant.  A productive morning all round, I'd say.

6.2.14

Make a Valentine garland - tutorial


Valentine's Day is nearly here.  Note that there is no exclamation mark at the end of that sentence.  That's because I couldn't be any less excited and more annoyed if I tried.   There are wads of catalogues in my letterbox spruiking jewellery and chocolates and wine, and massively over-priced cards at the doorway to the supermarket, the post office, the newsagent....?!  Could we get over Christmas already, please?  I am a Valentine Grinch!

But it's still nice to express some adoring sentiment to those you love (though not too soft and soppy- yuck!); be it your partner, your kids, or your best girlfriends.  But, if you had to buy a card for every single one of them, you'd soon be dirt poor, and they probably wouldn't love you as much.  Oh, just kidding, of course they would.  But they would probably love you more if you could afford to take them out for coffee and a nice piece of cake, instead of spending all your money on some garish, glittery, heart-infested card which will be banished to a drawer (or bin) once Valentine's Day is over.  For me, coffee and cake is always preferable.

So, save your pennies for cake and instead make a simple garland for your Valentine. Mine cost under a dollar, but  you could easily make it for nothing with cardboard and string that you have about the house.  If it's not too gushy or gauche, it could be left up all year long. 

What you need

Thin cardboard.  I bought mine at the newsagent for fifty cents.  Or you might find something suitable about the house (old greeting cards, packaging, etc)

Scissors

Glue

Craft knife (not essential, but handy)

Double sided tape (again not essential, you could use glue instead)

Something to string your message on.  I used black crochet cotton I already had.  Twine, fishing line, cotton yarn, etc. could all be used.  Of course, the length of the string depends on how long your message is, what size font you use, how you decorate the ends (if you're going to) etc.  Give yourself about 12 inches or so longer than s generous guess at what you think you need.  It's easier to cut of the ends than have to start all over again!

Other optional things - small washers for weighing down the ends of the string
                                  pretty coloured cardboard or sequins, little pompoms,beads etc to decorate.

What to do

Think of something short and sweet and adoring you want your garland to say.  But here's the thing, there are certain letters of the alphabet worth avoiding.  Like the letter O.  It is really difficult to cut a perfectly round O with a pair of scissors - you end up with jagged edges and bad symmetry.  Well, I do.  And, yes, I know, the words 'love' and 'you' contain this pest of a letter. Also, the letter B, or R, or any other letter that has a space that you have to trim out with a blade is a bit painful, too.  Think outside the square and try to come up with a sentiment that has very few of these pesky letters.  (I am not a fan of text-speak, but it could really help you out here).   Or  you could use a font that is more squared.

The font I used was Arial Black, with a size of 150, but you can choose whatever you like.  Print out your message on some paper.  This is your cutting guide


Trim along the top of the letters in a straight line, so there is no free space.  This edge will be place on the fold of your cardboard. 


Take the cardboard your using and along one of the long sides, fold it - how much you need to fold it depends on how big your letters are.  You'll be gluing the letters along the fold of a double thickness, so when folded the cardboard needs to be the same height as your letters, plus about a half inch. (Important - if you are using a fancy cardboard with a design or effect on one side, fold it so that the design is on the inside.  After cutting, the letters will be turned inside out - so to speak).


Glue your letters to your cardboard, making sure that where you cut them along the top meets the fold of the cardboard.


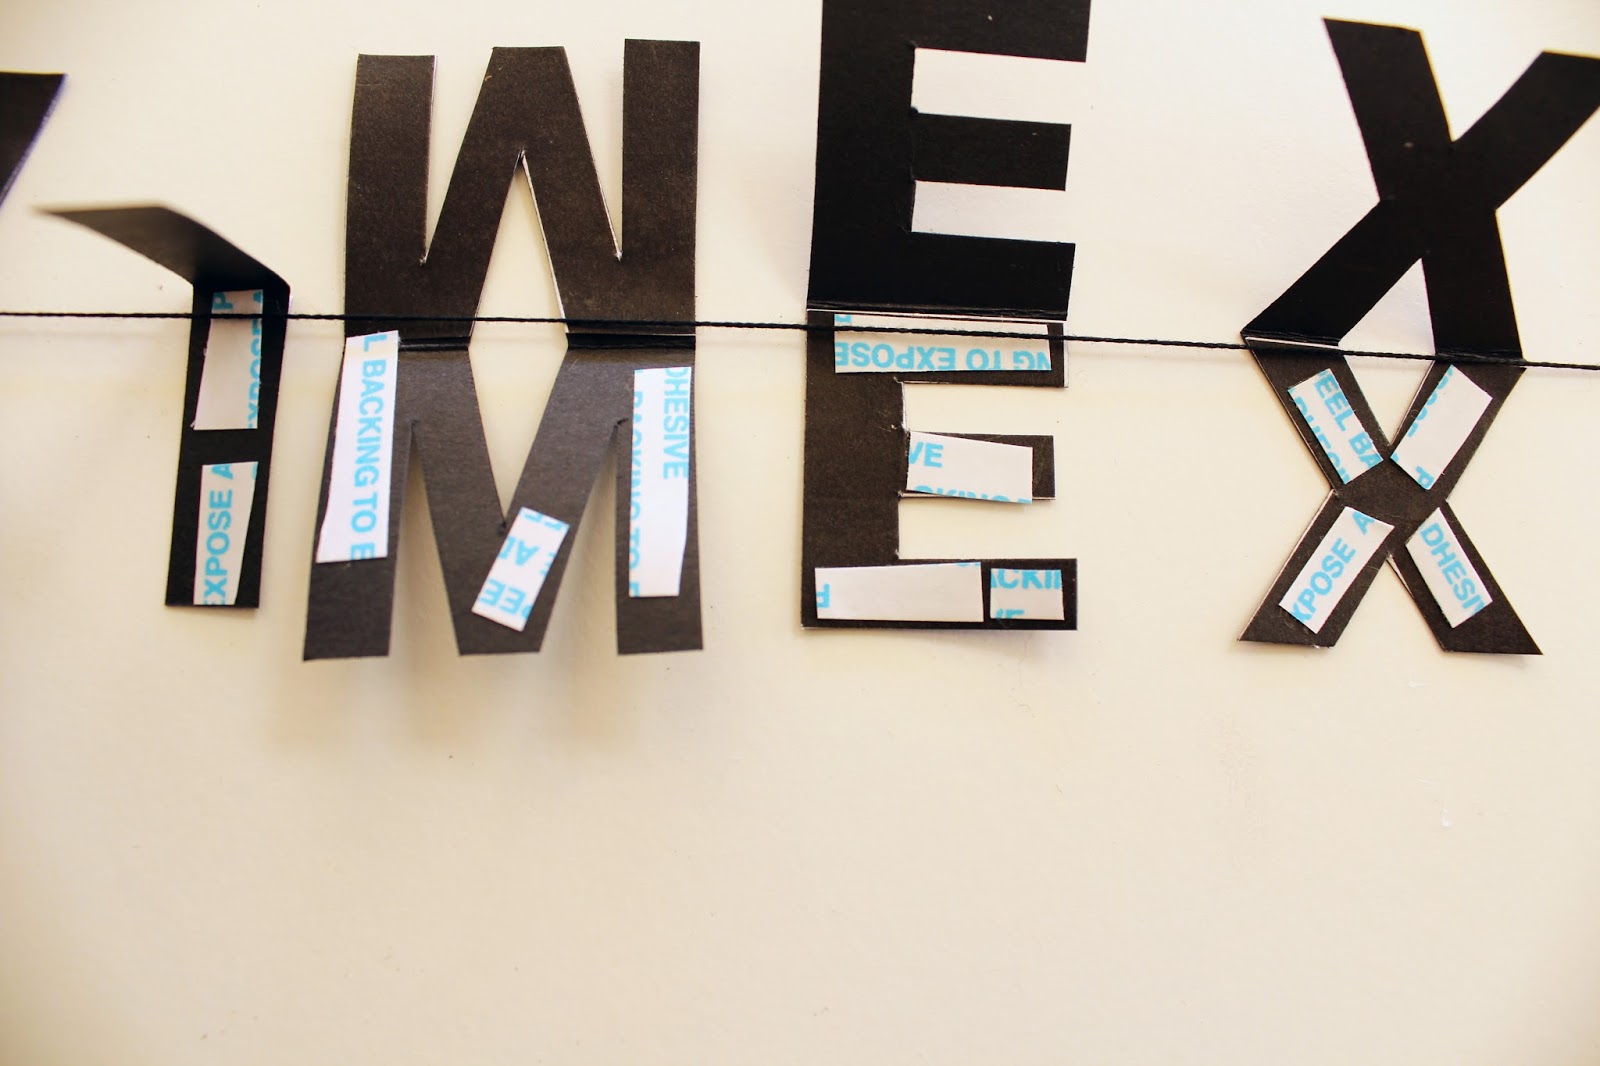
Cut out the letters using scissors and/or a craft knife.  (I could use scissors for the bulk of my cutting, but used a knife to cut that little gap out of the A).  Fold the letters back so that the cutting guide is on the inside - when stuck together it will not be seen.


Tape the two ends of string to a flat surface, making sure the string is taut but not tight (having the string taut will assist you in spacing the letters correctly - if it's loose the spacing won't be as uniform).  Fold the letters over the string and arrange them.


Stick the inner surface of the letters together, using glue or double sided tape.  (I prefer tape because it doesn't wet the paper and make it bubbly when it dries).


And here it is all stuck down.  Un-tape it from the board, it's basically done.


Now, you may want to decorate the ends.  I used some stars for mine, because I am a bit over the whole love-heart thing, but of course you can use hearts, kisses or something else.  (Tip:  I tied small washers to the end of the strings to give them some weight, and then sandwiched these between my star shapes.)  Or some sequins or beads or small pompoms, or whatever you like.


Pack it up in a nice little bag (being careful not to tangle it) and give it to your Valentine.  Or surprise them by hanging it up where they can see it - a window, the bathroom mirror, a door-way (obviously, this is only advisable if you actually live with them or have been given a key to come and go as you please -  of course, breaking into someone's house to string up messages of love is just creepy, not to mention criminal).


Happy Valentine's Day.  I hope you get lots of kisses and cuddles and flowers and love and stuff.

By the way, here's my Valentine *swoon* - I love this kid! (...and there's the exclamation mark!)


7.9.13

Put on a happy face - it's Election Day!


The kids had some fun making faces today.  It's amazing how some cardboard, paint, sequins and glue can make a couple of hours fly by.  Especially those sequins.  That kept Cameron busy for a good hour or so.  Which is probably just as well, being polling day and hearing nothing on the radio and television except for Labor this and Liberal that.  Boring for everybody.


Sophie made a face, too, but hers was done in about five minutes, as is evident in the final product.  We tried to encourage her to draw eyes and a nose, but were met with a loud and resounding "NO!", and the typical "I'll-do-it-the-way-I-want-thanks" glare, which is becoming increasingly normal.  She was keen to put sequins on, too, but after gluing them to her hands, her face, the chair, the floor, etc. we decided that hers was better off sparkle-free.  The few she did manage to glue to her artwork were picked off before photo-time.


This will be how wide my smile is tomorrow when the Election is over.  Hooray! - no more political flyers choking my letterbox, or being accosted while grocery shopping by local party members, or receiving pre-recorded telephone calls from Tony Abbott right in the middle of dinner or while I'm trying to get the kids to bed.  That was just annoying.  Gee, I wish I had his home number.

9.5.13

Franken-bunny paper doll


It has been persisting with rain over the last few nights, so it was time to drag out the craft box and have a muck about.  Cameron and I started this a couple of nights ago, and finished it tonight (we had a break last night because I was at work, and arts and crafts isn't Paul's thing.  They watched Iron Man cartoons instead).

It's basically lots of cardboard scraps and odds and sods and magazine pages stuck together with paper fasteners.  And then all tied up with a lovely bow.


Check out the baby penguin foot.  That was totally his idea.  We'll just call it quirky.
 

Related Posts Plugin for WordPress, Blogger...