Showing posts with label scrapbusters. Show all posts

3.1.15

Clownie romper.


More projects from the scrap pile.  I ran up this little romper from a piece of floral fabric I had left over from this dress  that I made some time ago.  There wasn't quite enough to make something for Sophie, but still a substantial enough remnant to make something.  I'm not sure who this is for yet, but I'm sure somebody I know will be having a baby at some point in the future, or know of someone else who will.  Not me, though.  No way!  That horse has well and truly and gladly bolted.  Phew.

My obsession with all things circus-like is an influence here.  The clownish frill around the neck is made of a grey and white cotton seersucker, bound with self bias and left with a raw hem.  I was sort of experimenting at the start  and didn't have the inclination for time consuming niceties such as hemming ruffles.   But as I was making my way through it, I was having fun watching it all come together, and did in fact start paying more attention to detail toward the end.  Too late for the neck ruffle, though.


It buttons at the back with two vintage buttons  (the top one is concealed by the frill), and opens at the crotch with snap fasteners.  The type you hammer on. That was a first for me, and I was surprised how easy it was.  Noisy though.  I was hammering away and my husband yelled, "What ARE you doing in there??"  "I'm making a baby romper!  Derrrrrrrr...!"


This is such a light little suit, it would be just fine on it's own in the summer months, but I can see it worn over tights in the cooler weather and topped with a cosy cardigan and cute knit hat.  I really wish I had a little baby to put this on and photograph - awwww,  too cute!  I really miss being able to dress Sophie in teeny, sweet clothes (not that she's ever been that teeny).


 And I really love this autumn-ish floral and am quite disappointed that I'm almost completely out of it.   I possibly have enough left to make a doll and some scrunchies, but that's it.  That's sad.

9.8.14

Making new friends


Sometimes, I just like to sit and have a muck about with my fabric scraps.  Most times, it ends up with me swearing like a trooper, throwing said muck-about in the bin and storming off to bed angry at myself for wasting hour upon hour on achieving nothing. 

But something really magical happened this week, and I ended up with this little lady sitting on my bed and an absolute tonne of ideas for more.  I felt extremely happy as I was making her, disappointed when I had to put her aside to do other things, and really excited about getting back to finishing her off.  Now that she is finished, I'm looking forward to making her a friend, or four.


She marries up alot of my interests - sewing, old time theatre, period costume, toy-making....um, pom poms.  I'm looking for ways I can somehow weave in children's clothing, and I think I've struck upon something.  Then again, it may be nothing.  I guess we'll see.

But even if not, I think I might have found my thing. She still needs some tweaking before I'm completely happy, but I'm mostly glad about how she she turned out.  And she didn't make me curse one single time.


29.6.14

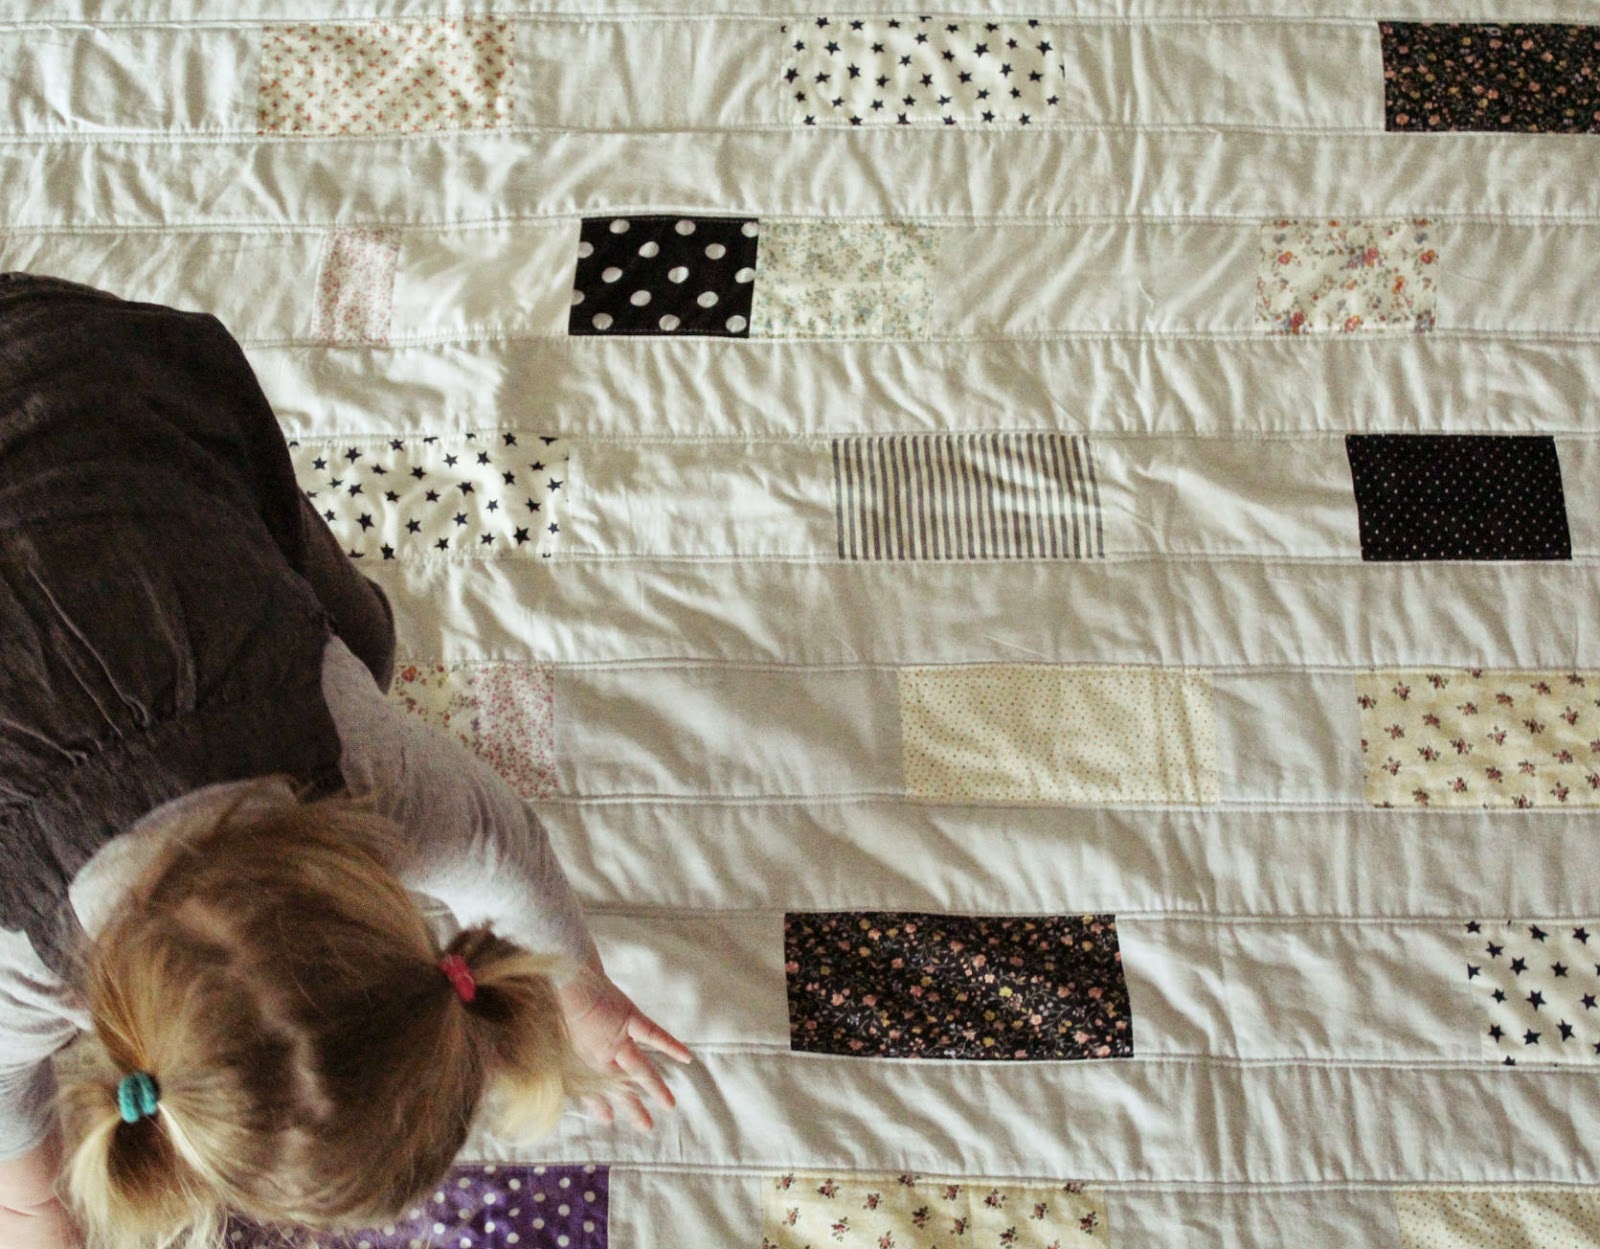
Another scrap quilt.


It's been freezing weather this weekend, so I got to finishing up this simple quilt, which I made up with yet more scraps from my stash and some cotton sheeting.  I was spurred by a near accident I nearly had in my car a couple of weeks ago - it was lucky I was my on my own, because I think I must have sworn more in the three minutes following the incident than I have in my entire life up to that point.  I'm certain my kids' ears would have dropped right off had they been in the car with me.  Why are there so many idiots driving?  My Lord!  Anyway, without going into detail, the thing that goes through my head (cursing aside) is not, "Gosh, I have to make sure my will is up to date", nor "What is that moron car's registration number?".  It's "I have to go home right now and make a quilt, so my kids have something to remember me by."  How dumb is that?

This is a bigger and comfier effort than my last quilt; I splurged and bought some proper cotton batting so it's soft and floppy and scrumfy.  The top went together really quickly - as you can see there's absolutely nothing complicated about it, no edges to line up or anything.  It's backed with sheeting, quilted in straight lines and the binding around the edge is made from a cotton laundry sack.


I know it's no masterpiece, not by a long shot.  I'm sure it has at least a hundred things wrong with it.  But despite it's imperfections, I love how it turned out, all worn-looking and scrappy. 


 And I'm also secretly pleased that the kids are already fighting over it.  It looks like another one will be on the to-do list and through the sewing machine very soon.  But, hopefully, next time, the inspiration won't nearly kill me.


22.5.14

Butterfly wings - tutorial


More dress-ups!  Just because I love them.  I think love them much more than Sophie does.  If wings like this were socially acceptable for me to wear in public, I most probably would.  If they actually worked, that would be even better. It's been one of those weeks...

These butterfly wings are a cinch to make, and can be made out of small amounts of leftover fabrics.  They slip on the shoulders back-pack style with elastic loops, and can be decorated however you like.   A bunch of these can be made up fairly quickly to keep handy as gifts,  and if your little girl was having a party, these would make a great party favour that guests could wear during celebrations and then take home instead of lollies.  Or, as well as lollies.

What you need -

Fabric for the wings.  Each side (front and back) needs a piece of fabric that is 40cm (16inches) wide by 35cm (14inches) high. Matching, co-ordinating or clashing in colour. Pre-washed cotton fabric is easy to sew, but it could be something shiny or sparkly.  (The fabric I've used on the spotted one is from a very unfashionable skirt I picked up at a second hand store, which isn't cotton.  The back of it is from an old pillow case.)

Extra fabric, again 40cm (16 inches) wide by 35cm (14 inches) high.  This doesn't have to be anything fancy, it will end up on the inside of the wings and you won't see it.  You'll be tracing the pattern onto it, so the plainer the better.  Have a look through your stash for something your dying to get rid of.

Craft wadding (the cheap stuff is fine).  Once again, 40cm (16 inches) wide by 35cm (14 inches) high.

A sheet of craft foam  (to make an inner stabiliser)

About 1 metre of 6mm (1/4 inch) elastic.

Thin card (cereal box) for making template.

Anything  you's like  to decorate your wings with.  Pom poms, ribbons beads, jingle bells, etc.

The usual stuff.  Pins, needle, thread, sewing machine, etc.


What  you do -

Firstly, save the pattern sheet below to your computer, print out two copies of the pattern template onto paper and cut it out.  This pattern template is obviously only half the wings, and you need to make full wings template. 


Fold your cardboard in half and glue the centre line of the template along the fold of the cardboard, cut around the outer wings through both layers of card so that you have a full wing template.  You also need to cut out a template for the inner stabiliser.


Next up stack your fabrics and wadding on a table as follows

- underside of wing fabric (that is the fabric that will be facing the child's back), face up
- outer wing fabric, face down
- wadding,
- and the plain fabric on which you'll draw around your fabric, on top.


Place template on fabric and trace around it.  Don't forget to include the markings for the opening.


Pin as shown through all layers so that nothing shifts as you run it throught the sewing machine.


Stitch around the drawn outline, leaving the  the gap where marked.


Trim around the wing shape, about 1/4 inch from stitching.


Clip around curves, and into corners.


Turn your wings inside out so that the underside and outer wing fabrics are showing, and the batting and plain fabric are on the inside.  Give it a press with the iron.


Make the inner stabiliser.  Trace around pattern template onto craft foam sheet and cut out.


Slide the stabiliser into the wings through the opening, between the batting and the plain fabric.  Bend and twist the stabiliser as needed in order to get it in place.  It's a little bit tricky, this bit.


 Hooray! - nearly done.

Fold in edges of opening and close with hand-stitching.


Top stitch around the wings, about a half centimetre (1/4 inch) from the edge.  I also like to sew a couple of lines down through the centre as well.


For the straps, take the end of the elastic and place it in between the child's shoulder blades, bring it over their shoulder like a back pack strap and back toward the starting point.  Pull it a bit so it's firm but not too tight (you don't want the straps too floppy, nor a threat to the child's circulation), and mark with pencil. Double it over to give yourself twice the length, add about a half inch and cut.    (* Note - if your a bit unsure, err on the side of caution and make it looser rather than tighter.  If the wings sit too floppily when worn, you can always unpick the elastic from the wings, shorten it and re-sew it.)

Being careful not to twist it, and using a zig-zag stitch, sew it into a loop.  Place the elastic join at the top of the wing about a centimetre from the edge and machine stitch it through all layers.  Determine the opposite centre of the elastic (so that both shoulder loops are of the same size) and mark with pencil. 


Stitch at that point on top of the elastic already stitched on, to form the shoulder loops.


On the outer wings, you'll see the stitching you attached the elastic with.  It looks a bit ugly, so cover it up with any decorations you like.  Ribbons, a big bow, beads, a favorite brooch, etc.  If you are a regular visitor, you'll know pompoms are my personal favourite.


I've also added some fabric strips and a couple of jingle bells to Sophie's, to serve both as a handy way of keeping track of her movements while in the playground and also a warning to other children that she is nearby...


 ...because she's a sneaky ...bug.  I almost used another word then, which would probably have been more fitting, but not so G-rated.  I'm thinking of the children.


14.1.14

Flat pack fairy headwear - tutorial


Little girls are fickle creatures.  One minute, they want to dress up as delicate fairies, sporting fluffy tutus, pretty wings and sparkly headpieces, spinning about from here to there like music-box-ballerinas, and the next they are thrusting sticks violently into ant holes and excitedly watching the ensuing drama, or kicking bigger kids down the slide because they are 'being slow'.  The tutu gets grubby, the wand gets lost, the headgear and the wings comes off, and before long you're left with a messy kid and a handful of sparkly accessories to lug about until you're ready to go home.  That is unless your grub of a child decides she wants to be a fairy again five minutes later.

This little crown can be stored flat in a purse or nappy bag, and pulled out when your child has a sudden attack of the whimsy.  Make and pack an extra one just in case she finds a friend with fairy potential.

What you need (for each crown)

-  2 pieces of fabric of your choice for the outer and backing of the crown - each measuring  
   approx. 20cm x 30cm
-  Iron-on adhesive (I used Heat n Bond Lite) cut into 2 pieces - each measuring approx.
   18cm x 28cm (just slightly smaller than the crown outer and backing)
-  A piece of woolen fabric, or felt - measuring 20cm x 30cm
-  Bias binding - 10mm wide 
-  6mm elastic
-  Velcro (hook and loop tape) -  approximately a 10cm strip
-  Embellishments - craft pompoms, ribbons, beads, sequins, etc.  Consult your fairy princess for  
   ideas.
-  Materials for making your template - paper, thin cardboard, glue.  Or print it out on cardstock.

What you do!

Firstly, save the pattern sheet below to your computer, print out the pattern template onto paper, glue onto thin cardboard, leave to dry, and then cut out.  Or, if you have card-stock available, print the template straight onto that and cut out and save loads of time.


Following the manufacturers instructions, apply the iron-on adhesive onto the wrong side of your chosen fabrics. 


 Leave to cool for a bit, then, again following the manufacturer's instructions, apply the fabrics to both sides of the woollen fabric, or felt.


Place the template on the side that has the fabric you are using as the backing, and trace around it with pencil or chalk.


Cut out crown shape carefully.


Cut a 24 cm piece of 10mm bias binding.  Iron it out flat.  Pin binding along bottom edge on right side, folding in the ends so that they are in line with the crown's sides.


Using your sewing machine, stitch with a 6mm (1/4 inch) seam allowance. 


 Fold the bias binding over to backing side, forming an even edging and press  (I don't turn in the long edge on the backing side, I just leave it).  Hand baste into place. 


 Using your sewing machine again, stitch in the ditch between the crown and binding on the right side (you'll catch the binding on the rear side at the same time).  Remove hand basting.


 Make button holes where marked.


Cut and trim velcro to size.  Pin and stitch the rough 'hooking'  piece to the outer crown on the far right, as pictured. 


Turn crown over so the backing is facing upwards.  Pin and stitch the fuzzy catchy strip to the far right side again, as pictured.  (Velcro piece will be on opposite ends of the crown, one on the outer crown, and one on the backing.  I hope that makes sense :S)


Measure the elastic around your fairy's head.  The crown is worn with the elastic coming around the back of the head and toward the front, much like an Alice-type hairband.  Measure it so it's firm, but not tight, and leave a bit of extra length for adjustment.  Thread each end of the elastic through the  button holes into the crown with the aid of a safety pin.


 Knot it to the length you require (the knot should be hidden within the crown when worn), then trim elastic ends to within about 1 to 2cm of the knot (you can sew these with a few stitches to the elastic, just to keep them in place, if you like).


To decorate ours, we very simply just fixed some small craft pompoms to the  top of each point, sewn to the front side at almost the very top, with very small stitches.  The very top of the crown's points were visible above the pompoms, so we carefully clipped them off, just to neaten it up. 


However, you and your fairy could add sparkly sequins or beads, buttons or bows - go as crazy (or as not) as you wish.

Keep one or two packed in your purse or in the dash of your car and pull them out for photo opportunities or five minute fairy games (before the hunt begins for a big stick to poke into an ant colony).

Sweet.  But don't be fooled.
Related Posts Plugin for WordPress, Blogger...